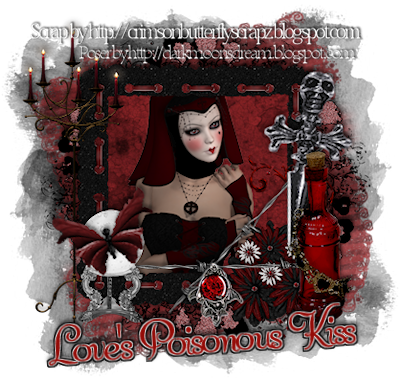
Love's Poisonous Kiss
This tutorial is my own creation and based on my own ideas. Any and all similarities with any other tutorial is purely coincidental.
Please do not upload to or offer this tutorial on any other site without asking me first. Thank you.
Material you will need:
PaintshopPro – I’m using PSP X2, but you should be able to follow the tutorial in any version.
A scrap kit – I used the stunning kit Loves Poisonous Kiss by Crimson Butterfly Scrapz, which you can purchase here.
A font of your choice.
A tube of your choice.
2 masks –I used WSL 254 and 283, created by Weescotslass, which is included in the material. Check out her blog here for further masks.
No filters required.
You can get the material here.
Now, let’s get started. It might be helpful if you choose the elements you wish to use beforehand, and open them up in PSP prior to starting the tutorial. That way, you have them handy when following each step.
Also, you don’t have to slavishly follow each positioning nor setting – play and experiment a bit, especially if you use different elements.
If you are unsure how to position an element, refer back to my sample tag.
I do assume you have at least some to moderate experience and understanding of PSP.
The DropShadow throughout the tutorial remains the same: V/H -3/1 O/B 52/5.55.
Resizing throughout the tutorial is done with “Resize all Layers” NOT checked.
Open a new image, 600x600, transparent background.
Open cbsframe3, copy&paste, Resize 35%.
Open cbsframe1, copy&paste, Resize 45%, on top of round frame.
Open tube, copy&paste, Resize to liking.
With your Magic Wand, click inside the frame.
Selections – Modify – Expand by 2.
On tube layer, Selections – Invert, hit “delete”.
Open cbspaper9, copy.
Selections – Select none.
New layer, underneath second frame layer.
With your Magic Wand, click outside the second frame (the square one), Selections – Invert.
Selections – Modify – Contract by 6.
On the new layer, Paste into Selection, Selections – Select none.
On frame layer, merge down twice (frame, tube & paper).
Apply Dropshadow.
Open cbsbrbdwire, copy&paste, Resize 35%, position on top of the second frame, towards the bottom.
Apply Dropshadow.
Duplicate, Free Rotate – Left – 47 degrees, and position a bit more to the right.
Open cbsdagger1, coy&paste, Resize 65%, on top of barbed wire layer, Free Rotate – Right – 10 degrees and position to the top and right side of the frame.
Apply Dropshadow.
Open cbsbroach, copy&paste, Resize 45%, position where the barbed wires cross.
Apply Dropshadow.
Open cbsbttle, copy&paste, Resize 45%, on top of dagger layer, to the right side of the frame.
Apply Dropshadow.
Open cbscandles, copy&paste, Resize 47%, on top of second frame layer, move to the left.
Apply Dropshadow.
Open cbscrslbll, copy&paste, Resize 30%, position on top of candles, to the left, but a bit further to the right than the candles.
Apply Dropshadow.
Open cbsbfly1, copy&paste, Resize 22%, Free Rotate – Left – 19 degrees, position on top of crystal ball.
Apply Dropshadow.
New layer, Arrange – Send to Bottom.
Open cbspaper12, copy.
On new layer, Paste into Selection, Selections – Select none.
On New Layer, Selections – Select All – paste into selection.
Layers – Load/Save Mask – Load Mask – MaskWSL_254.
Fit to layer, show all masks, source luminance checked; invert transparency NOT checked.
Merge group.
Optional: resize mask or use your Deformation Tool, if necessary, to tweek your mask layers to your liking and/or lower the opacity.
New layer, on top of the previous paper layer.
Open cbspaper2, copy.
On new layer, Paste into Selection, Selections – Select none.
On New Layer, Selections – Select All – paste into selection.
Layers – Load/Save Mask – Load Mask – MaskWSL_283.
Fit to layer, show all masks, source luminance checked; invert transparency NOT checked.
Merge group.
Optional: resize mask or use your Deformation Tool, if necessary, to tweek your mask layers to your liking and/or lower the opacity (I lowered mine to about 75%). Also, I rotated my paper 11 degrees to the left.
Now, the next step is to add any further text, copyright information and your watermark to the graphic.
Feel free to merge all layers visible and then resize to your liking or crop the image.
If you prefer a transparent background, save your tag in PNG format.
Otherwise, if you select the JPG, it will automatically add a white background.
Should you care for a different colored background:
New layer, arrange, send to bottom, and floodfill with your color of choice.
I hope you enjoyed this tutorial!
XOXOXO,
Dani


No comments:
Post a Comment