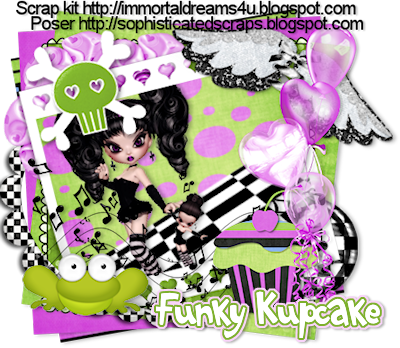
Funky Kupcake
This tutorial is my own creation and based on my own ideas. Any and all similarities with any other tutorial is purely coincidental.
Please do not upload to or offer this tutorial on any other site without asking me first. Thank you.
Material you will need:
PaintshopPro – I’m using PSP X2, but you should be able to follow the tutorial in any version.
A scrap kit – I used the awesome kit Funky Kupcake by Immortal Dreams , which you can purchase here.
A font of your choice.
A tube (or two) of your choice.
No filters required.
Now, let’s get started. It might be helpful if you choose the elements you wish to use beforehand, and open them up in PSP prior to starting the tutorial. That way, you have them handy when following each step.
Also, you don’t have to slavishly follow each positioning nor setting – play and experiment a bit, especially if you use different elements.
If you are unsure how to position an element, refer back to my sample tag.
I do assume you have at least some to moderate experience and understanding of PSP.
The DropShadow throughout the tutorial remains the same: V/H 1/3 O/B 31/6.25.
Resizing throughout the tutorial is done with “Resize all Layers” NOT checked.
Open a new image, 600x600.
Open ID-FK_Frame 7, copy&paste, Resize 50%.
Open ID-FK-Frame 5, copy&paste, Resize 45%, place on top of first frame, new layer, underneath second frame layer, with Magic Wand, click inside the frame, Selection – Expand by 2.
Open ID-FK-Paper 13, copy, Paste into selection, Select none.
Open ID-FK-Floor, copy&paste, Resize 40%, Free Rotate – Left – 19 degrees, underneath second frame layer, on top of paper layer.
Click with your Magic Wand inside the second frame, Selection – Expand by 2, Invert, on floor layer, hit “delete”, Select none.
Open your tube, copy&paste, Resize and position to liking. If necessary, click with your Magic Wand inside the frame, Selections – Expand by 2, Invert, on tube layer, hit “delete”, Select none.
Merge second frame layer, tube, floor and paper layer, Free Rotate – Left – 14 degrees.
Open ID-FK-Button 2, copy&paste, move underneath second frame, to the bottom right, Apply Dropshadow.
Open ID-FK-Flower 1, copy&paste, Resize 45%, move underneath frame layer, to the upper left side – duplicate and position as often as you like, Apply Dropshadow to all flowers.
Open ID-FK-Notes, copy&paste, Resize 45%, on top of second frame layer, to the bottom edge, Apply Dropshadow.
Open ID-FK-Balloons, copy&paste, Resize 18%, Resize 85%, move to the right side of the frame, Apply Dropshadow.
Open ID-FK-Doodle, copy&paste, Resize 50%, move underneath second frame layer.
Open ID-FK-Frog, copy&paste, Resize 20%, move to the bottom left, on top of second frame, Apply Dropshadow.
Open ID-FK-Heart Wings2, copy&paste, Resize 35%, Free Rotate – Right – 26 degrees, move to the upper right corner, Apply Dropshadow.
Open ID-FK-Skull 2, copy&paste, Resize 85%, move to the upper left on top of the second frame.
Open ID-FK-Paper 19, copy&paste, Resize 40%, Free Rotate – Left – 10 degrees, Arrange, Send to Bottom, Apply Dropshadow.
Open ID-FK-Paper 3, copy&paste, Resize 42%, Free Rotate – Left – 3 degrees, Apply Dropshadow.
Open ID-FK-Paper 17, copy&paste, Resize 41%, Free Rotate – Right – 7 degrees, Apply Dropshadow.
Now, the next step is to add any further text, copyright information and your watermark to the graphic.
Feel free to merge all layers visible and then resize to your liking or crop the image.
If you prefer a transparent background, save your tag in PNG format.
Otherwise, if you select the JPG, it will automatically add a white background.
Should you care for a different colored background:
New layer, arrange, send to bottom, and floodfill with your color of choice.
I hope you enjoyed this tutorial!
XOXOXO,
Dani


No comments:
Post a Comment