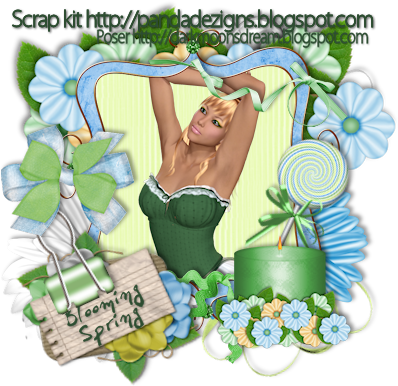
Blooming Spring
This tutorial is my own creation and based on my own ideas. Any and all similarities with any other tutorial is purely coincidental.
Please do not upload to or offer this tutorial on any other site without asking me first. Thank you.
Material you will need:
PaintshopPro – I’m using PSP X2, but you should be able to follow the tutorial in any version.
A scrap kit – I used the marvellous kit Blooming Spring by P & A Dezigns, which you can purchase here.
A font of your choice.
A tube of your choice.
No filters required.
Now, let’s get started. It might be helpful if you choose the elements you wish to use beforehand, and open them up in PSP prior to starting the tutorial. That way, you have them handy when following each step.
Also, you don’t have to slavishly follow each positioning nor setting – play and experiment a bit, especially if you use different elements.
If you are unsure how to position an element, refer back to my sample tag.
I do assume you have at least some to moderate experience and understanding of PSP.
The DropShadow throughout the tutorial remains the same: V/H -2/3 O/B 39/5.78.
Resizing throughout the tutorial is done with “Resize all Layers” NOT checked.
Open a new image, 600x600.
Open DS_Golden Frame1, copy&paste, Resize 55%.
Open paper5, copy.
Click with your Magic Wand in between the space between the inner and outer ‘edge’ of the frame, Selections – Expand by 1, new layer, move underneath frame layer.
On new layer, Paste into Selection, Select none.
Open paper15, copy.
With your Magic Wand, click inside the center of the frame, Selections – Expand by 1, new layer, move underneath frame layer.
On new layer, Paste into selection, Select none.
Open your tube, copy&paste, move underneath frame layer, Resize and position to liking.
If necessary, click with your Magic Wand inside the frame again, Selections – Expand by 1, Invert, on your tube layer, hit “delete” once, Select none.
Merge layers visibly, Apply Dropshadow.
Open stretchstring2, copy&paste, Resize 45%, place on top of frame, towards the bottom, Apply Dropshadow.
Open candle3, copy&paste, Resize 28%, on top of the frame layer, move to the right bottom corner, Apply Dropshadow.
Open embellishment1, copy&paste, Resize 30%, Free Rotate – Left – 10 degrees, on top of the candle layer, and move to the left bottom corner, Apply Dropshadow.
Open clip1, copy&paste, Resize 23%, Free Rotate – Left – 25 degrees, place on top of journal paper, Apply Dropshadow.
Open element3, copy&paste, Resize 45%, Free Rotate – Right – 112 degrees, Arrange – Send to bottom, move to the upper right corner, Apply Dropshadow.
Open element1, copy&paste, Resize 45%, Free Rotate – Left – 102 degrees, Arrange – Send to bottom, move to the bottom right corner, Apply Dropshadow.
Open bow5, copy&paste, Resize 35%, move on a little higher than the journal paper, to the left, Apply Dropshadow.
Open lollipop4, copy&paste, Resize 35%, Free Rotate – Right – 25 degrees, move underneath candle layer, to the right side, Apply Dropshadow.
Open ribbon1, copy&paste, Resize 35%, move to the right upper cornerApply Dropshadow.
Open flower5, copy&paste, Resize 45%, move underneath frame layer, to the bottom left corner, Apply Dropshadow.
Open flower8, copy&paste, Resize 40%, move underneath frame layer, to the bottom right corner, Apply Dropshadow.
Open flowercluster, copy&paste, Resize 65%, move underneath frame layer, to the top edge of the frame.
Now, the next step is to add any further text, copyright information and your watermark to the graphic.
Feel free to merge all layers visible and then resize to your liking or crop the image.
If you prefer a transparent background, save your tag in PNG format.
Otherwise, if you select the JPG, it will automatically add a white background.
Should you care for a different colored background:
New layer, arrange, send to bottom, and floodfill with your color of choice.
I hope you enjoyed this tutorial!
XOXOXO,
Dani


Oh my goodness you did a most AWESOME job with my kit! I could NOT have done better! Thank you so much!!!! Feel free to use any kit I have! Just let me know and it's yours!
ReplyDelete