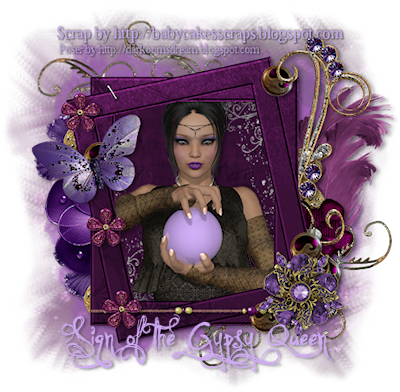
Sign of the Gypsy Queen
This tutorial is my own creation and based on my own ideas. Any and all similarities with any other tutorial is purely coincidental.
Please do not upload to or offer this tutorial on any other site without asking me first. Thank you.
Material you will need:
PaintshopPro – I’m using PSP X2, but you should be able to follow the tutorial in any version.
A scrap kit – I used the beautiful kit Sign of the Gypsy Queen by Baby Cakes Scraps, which you can purchase here.
A font of your choice.
A tube of your choice.
2 masks –I used WSL 249 and 255, created by Weescotslass, which is included in the material. Check out her blog here for further masks.
No filters required.
You can get the material here.
Now, let’s get started. It might be helpful if you choose the elements you wish to use beforehand, and open them up in PSP prior to starting the tutorial. That way, you have them handy when following each step.
Also, you don’t have to slavishly follow each positioning nor setting – play and experiment a bit, especially if you use different elements.
If you are unsure how to position an element, refer back to my sample tag.
I do assume you have at least some to moderate experience and understanding of PSP.
The DropShadow throughout the tutorial remains the same: V/H 2/3 O/B 42/6.35.
Resizing throughout the tutorial is done with “Resize all Layers” NOT checked.
Open a new image, 500x650, transparent background.
Open bcs stapled frame, copy&paste, Resize 40%.
Open bcs sparkle paper, copy.
With your Magic Wand, click inside the frame, Selections – Modify – Expand 2.
New layer, paste into selection, Selections – Select none.
Open your tube, copy&paste, move underneath frame layer, Resize and position to liking.
Note: if parts of your tube are sticking ‘out’ of the frame, either use the Magic Wand, click inside the frame, Expand 2, Invert and hit “delete” on your tube layer, or use your Selection Tool to erase those parts.
Apply Dropshadow.
Highligh frame layer, and merge down twice (frame, tube & paper).
Apply Dropshadow.
Open bcs brooch, copy&paste, Resize 25%, move to the right lower corner of frame.
Apply Dropshadow.
Open bcs gem curl, copy&paste, Resize 65%, move to the right side of the frame, on top of the frame (if you want my effect – also use your Point-to-Point Selection Tool to erase the lower part of the curl – otherwise, feel free to move it underneath frame layer).
Apply Dropshadow.
Open bcs fiber beads, copy&paste, Resize 22%, move underneath brooch layer, to the lower edge of the frame.
Apply Dropshadow.
Open bcs butterfly, copy&paste, Resize 70%, move the right side of the frame.
Apply Dropshadow.
Open bcs berry glittery flower, copy&paste, Resize 20%, move on top of the fiber beads and position on top of the fiber beads, on the ‘inner’ frame (see preview for position).
Duplicate and move a bit higher along the frame.
Duplicate again, and move higher, close to the top edge of the frame.
Apply Dropshadow to all three flowers.
Open bcs berry button, copy&paste, Resize 30%. Duplicate, and position to liking.
Apply Dropshadow to all buttons.
Open bcs glitter flower, copy&paste, Resize 30%, move underneath frame layer and position to the left side of the frame, under butterfly.
Duplicate, Free Rotate – Left – 33 degrees, and position a bit higher than first glitter flower.
Apply Dropshadow to both.
Open bcs purple flower, copy&paste, Resize 20%, move underneath frame layer, on top of the two glitter flowers.
Apply Dropshadow.
Open bcs feather, copy&paste, Resize 45%, Free Rotate – Right – 100 degrees, move underneath frame layer, to the right side of the frame.
Open gold button, copy&paste, Resize 40%. Duplicate and position to liking.
Apply Dropshadow to all gold buttons.
Open paper flower, copy&paste, Resize30%, move underneath frame layer to the right side.
Apply Dropshadow.
Open golden doodle, copy&paste, move underneath frame layer and to the right bottom corner.
Duplicate, Free Rotate – Right – 35 degrees and move to the left upper corner.
New Layer.
Open bcs glitter paper, copy.
On New Layer, Selections – Select All – paste into selection.
Layers – Load/Save Mask – Load Mask – MaskWSL_249.
Fit to layer, show all masks, source luminance checked; invert transparency NOT checked.
Merge group.
Optional: resize mask or use your Deformation Tool, if necessary, to tweek your mask layers to your liking and/or lower the opacity.
New Layer.
Open bcs purple painted paper, copy.
On New Layer, Selections – Select All – paste into selection.
Layers – Load/Save Mask – Load Mask – MaskWSL_255.
Fit to layer, show all masks, source luminance checked; invert transparency NOT checked.
Merge group.
Optional: resize mask or use your Deformation Tool, if necessary, to tweek your mask layers to your liking and/or lower the opacity.
Optional: I merged both mask layers after I used the Deformation Tool, and lowered Opacity to 65%.
Now, the next step is to add any further text, copyright information and your watermark to the graphic.
Feel free to merge all layers visible and then resize to your liking or crop the image.
If you prefer a transparent background, save your tag in PNG format.
Otherwise, if you select the JPG, it will automatically add a white background.
Should you care for a different colored background:
New layer, arrange, send to bottom, and floodfill with your color of choice.
I hope you enjoyed this tutorial!
XOXOXO,
Dani


No comments:
Post a Comment