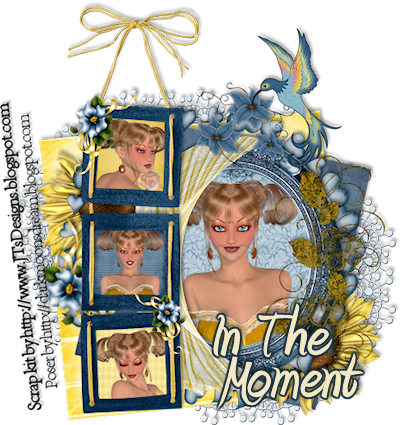
In The Moment
This tutorial is my own creation and based on my own ideas. Any and all similarities with any other tutorial is purely coincidental.
Please do not upload to or offer this tutorial on any other site without asking me first. Thank you.
Material you will need:
PaintshopPro – I’m using PSP X2, but you should be able to follow the tutorial in any version.
A scrap kit – I used the awesome kit In The Moment by JT’s Design, which you can purchase here.
A font of your choice.
4 tubes of your choice.
No filters required.
Now, let’s get started. It might be helpful if you choose the elements you wish to use beforehand, and open them up in PSP prior to starting the tutorial. That way, you have them handy when following each step.
Also, you don’t have to slavishly follow each positioning nor setting – play and experiment a bit, especially if you use different elements.
If you are unsure how to position an element, refer back to my sample tag.
I do assume you have at least some to moderate experience and understanding of PSP.
The DropShadow throughout the tutorial remains the same: V/H -3/2 O/B 33/6.45.
Resizing throughout the tutorial is done with “Resize all Layers” NOT checked.
Open a new image, 500x650, transparent background.
Open JTD_ITM_Frame2, copy&paste, Resize 40% and move a little to the left.
Open JTD_ITM_Paper3, copy.
With your Magic Wand, click inside the uppermost frame section.
New layer, move underneath frame layer, Selections – Modify – Expand by 2.
On new layer, paste into selection, Selections – Select none.
Open JTD_ITM_Paper9, copy & repeat the previous steps, but paste it into the central frame this time.
Open JTD_ITM_Paper5, copy & repeat previous steps, but paste this one into the bottom frame.
Open your first tube, copy&paste, Resize to liking, move underneath frame layer and position in the top frame.
If the tube is larger than the frame, click with your Magic Wand inside the frame, Selections – Modify – Expand by 2, Selections – Invert and on tube layer hit “delete”, Selections – Select none.
Repeat these steps with the two other tubes.
Highlight frame layer and merge down 6 times (frame, three tube and three paper layers).
Apply Dropshadow.
Open JTD_ITM_Frame1, copy&paste, Resize 35%, move underneath first frame layer.
Open JTD_ITM_Paper2, copy.
New layer, move underneath oval frame.
With your Magic Wand, click inside the oval frame, Selections – Modify – Expand by 2.
On new layer, paste into selection, Selections – Select none.
Open your fourth tube, copy&paste, Resize to liking, move underneath oval frame and position to liking.
Highlight oval frame, merge down twice (oval frame, tube and paper).
Apply Dropshadow.
Open JTD_ITM_Curtain2, copy&paste, Resize 25%, move on top of oval frame, to the left.
Optional: I erased top part of the curtain that was extending over the oval frame.
Apply Dropshadow.
Open JTD_ITM_FlowerDoodle1, copy&paste, Resize 40%, move to the right edge of the oval frame.
Apply Dropshadow.
Open JTD_ITM_HeartRing, copy&paste, Resize 65%, move under oval frame layer, center.
Apply Dropshadow.
Open JTD_ITM_Sunflower3, copy&paste, Resize 40%, move underneath oval frame layer, into the bottom right corner.
Duplicate, Mirror, Flip and move to the upper left corner.
Apply Dropshadow to both sunflowers.
Open JTD_ITM_Doillie2, copy&paste, Arrange – Send To Bottom and move to the left upper corner.
Duplicate, and move to the bottom right corner.
Optional: I erased part of the second doillie that was overlapping with the first.
Optional: I applied a Dropshadow to both Doilies.
Open JTD_ITM_Paper12, copy&paste, Resize 40%, Free Rotate – Left – 6 degrees, move on top of doillies layers, to the left.
Apply Dropshadow.
Open JTD_ITM_Paper17, copy&paste, Resize 35%, Free Rotate – Right – 13 degrees, move on top of the first paper, and position it to the right.
Apply Dropshadow.
Open JTD_ITM_CornerBloom2, copy&paste, Resize 50%, Free Rotate – Left – 60 degrees, move underneath first frame layer, to the bottom and left side.
Apply Dropshadow.
Open JTD_ITM_Hummingbird, copy&paste, Resize 40%, Arrange – Bring to Top, and position to the right upper part.
Apply Dropshadow.
Now, the next step is to add any further text, copyright information and your watermark to the graphic.
Feel free to merge all layers visible and then resize to your liking or crop the image.
If you prefer a transparent background, save your tag in PNG format.
Otherwise, if you select the JPG, it will automatically add a white background.
Should you care for a different colored background:
New layer, arrange, send to bottom, and floodfill with your color of choice.
I hope you enjoyed this tutorial!
XOXOXO,
Dani


No comments:
Post a Comment