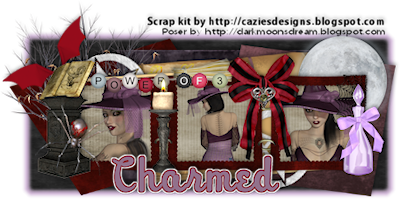
Charmed
This tutorial is my own creation and based on my own ideas. Any and all similarities with any other tutorial is purely coincidental.
Please do not upload to or offer this tutorial on any other site without asking me first. Thank you.
Material you will need:
PaintshopPro – I’m using PSP X2, but you should be able to follow the tutorial in any version.
A scrap kit – I used the beautiful kit Charmed (especially if you’re a fan of the series) by Cazie Designs, which you can purchase here.
A font of your choice.
Either 1 tube or 3 tubes of your choice.
Plugin: Eye Candy 3.1.
Now, let’s get started. It might be helpful if you choose the elements you wish to use beforehand, and open them up in PSP prior to starting the tutorial. That way, you have them handy when following each step.
Also, you don’t have to slavishly follow each positioning nor setting – play and experiment a bit, especially if you use different elements.
If you are unsure how to position an element, refer back to my sample tag.
I do assume you have at least some to moderate experience and understanding of PSP.
The DropShadow throughout the tutorial remains the same: V/H -2/1 O/B 37/6.44.
Resizing throughout the tutorial is done with “Resize all Layers” NOT checked.
Open a new image, 650x500, transparent background.
Open Charmed_Tripple Frame.3, copy&paste, Resize 45 %.
Open charmed_paper1, copy.
On frame layer, click with your Magic Wand inside all 3 section of the frame, Selections – Modify – Expand by 2.
New layer, under frame layer, paste into selection, Selections – Select none.
Open the first of your tubes, copy&paste, move underneath frame, into the left section of the frame, Resize and position to liking.
On frame layer, click with your Magic Wand inside the left section of the frame, Selections – Modify – Expand by 2, Selections – Invert.
On first tube layer, hit “Delete”, Selections – Select none.
Repeat with your second tube, positioning it in the center section.
Repeat with your third tube, positioning it in the right section.
On frame layer, merge down 4 times (frame, 3 tube layers and paper layer).
Apply Dropshadow.
Open tree, copy&paste, Resize 15%, move underneath frame layer, to the left, and a bit up.
Apply Dropshadow.
Open BOS 2, copy&paste, Resize 13%, Free Rotate – Left – 3 degrees, move underneath frame layer, on top of the tree layer, center it, but slightly to the right.
Apply Dropshadow.
Open moon, copy&paste, Resize 5%, move underneath frame layer.
Note: I have not applied a Dropshadow to the moon, but feel free to do so.
Open pentagram2, copy&paste, Resize 8%, Free Rotate – Left – 22 degrees, move on top of BOS layer, to the left upper edge of frame.
Duplicate, Mirror, and move to the bottom and to the right.
Apply Dropshadow to both pentagrams.
Open batwings1, copy&paste, Resize 10%, Free Rotate – Left – 40 degrees, move underneath frame layer, into the upper left corner.
Apply Dropshadow.
Open bookstand1, copy&paste, Resize 20%, on top of frame layer and move to the left side of the frame.
Apply Dropshadow.
Open spider1, copy&paste, Resize 12%, Free Rotate – Right – 17 degrees, on top of bookstand.
Open broom1, copy&paste, Resize 25%, Mirror, Free Rotate – Left – 4 degrees, move on top of frame, on the left upper edge.
Apply Dropshadow.
Open beads, copy&paste, Resize 6%, on top of frame layer, a bit to the left, above the broom.
Apply Dropshadow.
Open bow2, copy&paste, Resize 6%, on top of bead layer, position it over the right ‘gap’ between the center and right frame sections.
Apply Dropshadow.
Open web1, copy&paste, Resize 10%, on top of frame layer, and move into the right upper corner.
Optional: I erased part of the web.
Apply Dropshadow.
Open potion bottle 3, copy&paste, Resize 12%, on top of frame, to the right side of the frame.
Apply Dropshadow.
Open candle, copy&paste, Resize 20%, move on top of frame, position over ‘gap’ between the left and center frame.
Apply Dropshadow.
Open charmed_paper3, copy&paste, Resize 25%, Free Rotate – Left – 24 degrees, Arrange – Send to bottom, use Deformation Tool to ‘squeeze’ it to your liking.
Apply Dropshadow.
Open charmed_paper6, copy&paste, Resize 25%, move on top of first paper layer, somewhat center it, use Deformation Tool to ‘fit’ to liking.
Apply Dropshadow.
Open charmed_paper4, copy&paste, Resize 25%, move on top of second paper layer, position to the right, use Deformation Tool to ‘fit’ to liking.
Apply Dropshadow.
Open charmed_paper2, copy&pase, Resize 30%, Arrange – Send to bottom, center, use Deformation Tool to ‘fit’ to liking.
With your Magic Wand, click outside the last paper, Selections – Modify – Feather – 10, and hit “delete” twice (or as many times as you like), Selections – Select none.
Pick a color from your tube, and write down the Hex or RGB code.
Effects – EyeCandy 3.1 – Glow – 10 / 55, Medium - click in the color selection box, and enter your code.
Now, the next step is to add any further text, copyright information and your watermark to the graphic.
Feel free to merge all layers visible and then resize to your liking or crop the image.
If you prefer a transparent background, save your tag in PNG format.
Otherwise, if you select the JPG, it will automatically add a white background.
Should you care for a different colored background:
New layer, arrange, send to bottom, and floodfill with your color of choice.
I hope you enjoyed this tutorial!
XOXOXO,
Dani


No comments:
Post a Comment