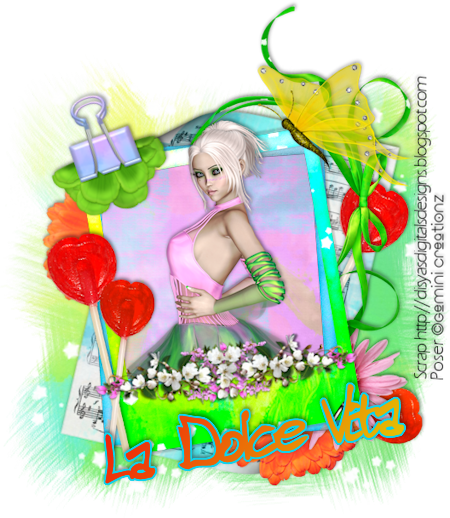
La Dolce Vita
This tutorial is my own creation and based on my own ideas. Any and all similarities with any other tutorial is purely coincidental.
Please do not upload to or offer this tutorial on any other site without asking me first. Thank you.
Material you will need:
PaintShopPro – I’m using PSP X2, but you should be able to follow the tutorial in any version.
A scrap kit – I used the fabulous kit La Dolce Vita by Disyas Digital Designs, which you can purchase here. This kit is also available in Full size.
A font of your choice.
A tube of your choice.
1 mask –I used WSL 116, created by Weescotslass, which is included in the material. Check out her blog here for further masks.
No filters required.
Now, let’s get started. It might be helpful if you choose the elements you wish to use beforehand, and open them up in PSP prior to starting the tutorial. That way, you have them handy when following each step.
Also, you don’t have to slavishly follow each positioning nor setting – play and experiment a bit, especially if you use different elements.
If you are unsure how to position an element, refer back to my sample tag.
I do assume you have at least some to moderate experience and understanding of PSP.
The DropShadow throughout the tutorial remains the same: V/H -2/-3 O/B 46/6.37.
Resizing throughout the tutorial is done with “Resize all Layers” NOT checked.
Open new image, 800 x 800.
Open Disyas_DV_SFr2, coy&paste.
Apply Dropshadow.
Open Disyas_DV_SFr7, copy&paste.
Open your tube, copy&paste, resize and position to liking inside the second (square) frame.
Apply Dropshadow.
Optional: use your Freehand Selection Tool – Point-to-Point, to erase any parts of the tube you don’t wish to stick out of the frame.
Magic Wand, click inside the second (square) frame, Selections – Modify – Expand by 3.
New layer, move underneath second frame layer.
Open Disyas_DV_P12, copy, on new layer, paste into selection, Selections – Select none.
On second frame layer, merge down twice (frame, tube & paper).
Open Disyas_DV_Border7, copy&paste, Resize 63%, Free Rotate – Left – 7 degrees.
Position on top of frame layers.
Open Disyas_DV_Butterfly3, copy&paste, Resize 75%, position in upper right corner.
Apply Dropshadow.
Open Disyas_DV_El25, copy&paste, position to liking.
Apply Dropshadow.
Open Disyas_DV_Flower9, copy&paste, Resize 55%, duplicate.
Move one towards the lower right corner.
On duplicate, Free Rotate – Left – 25 degrees, move to upper left corner.
Apply Dropshadow to both flowers.
Open Disyas_DV_Flower6, copy&paste, Resize 45%, move to lower right corner, on top of first flower.
Apply Dropshadow.
Open Disyas_DV_El29, copy&paste, Free Rotate – Right – 13 degrees, Arrange – Send To Bottom.
Apply Dropshadow.
Open Disyas_DV_Clip1, copy&paste, Resize 45%, Free Rotate – Left – 20 degrees, Arrange – Bring To Top, move to upper left corner.
Apply Dropshadow.
Open Disyas_DV_P9, copy&paste, Arrange – Send To Bottom.
Layers – Load/Save Mask – Load Mask from Disk – WSL_Mask116, Merge Group.
Repeat.
Optional: resize mask or use your Deformation Tool, if necessary, to tweak your mask layers to your liking and/or lower the opacity (I lowered mine to 60%).
Then, it is time to add any further text, copyright information and watermark to the graphic.
Feel free to merge all layers visible and then resize to your liking or crop the image.
If you prefer a transparent background, save your tag in PNG format.
Otherwise, if you select the JPG, it will automatically add a white background.
Should you care for a different colored background:
New layer, arrange, send to bottom, and floodfill with your color of choice.
I hope you enjoyed this tutorial!
XOXOXO,
Dani


No comments:
Post a Comment