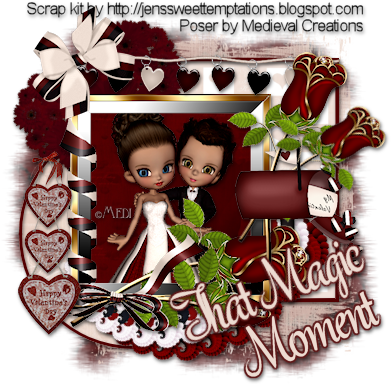
That Magic Moment
This tutorial is my own creation and based on my own ideas. Any and all similarities with any other tutorial is purely coincidental.
Please do not upload to or offer this tutorial on any other site without asking me first. Thank you.
Material you will need:
PaintshopPro – I’m using PSP X2, but you should be able to follow the tutorial in any version.
A scrap kit – I used the stunning kit The Magic Moment by Jens Sweet Tempations, which you can purchase here.
A font of your choice.
A tube of your choice (or one from the scrap kit).
A mask –I used WSL 223 and 238, created by Weescotslass, which is included in the material. Check out her blog here for further masks.
No filters required.
You can get the material here.
Now, let’s get started. It might be helpful if you choose the elements you wish to use beforehand, and open them up in PSP prior to starting the tutorial. That way, you have them handy when following each step.
Also, you don’t have to slavishly follow each positioning nor setting – play and experiment a bit, especially if you use different elements.
If you are unsure how to position an element, refer back to my sample tag.
I do assume you have at least some to moderate experience and understanding of PSP.
The DropShadow throughout the tutorial remains the same: V/H 2/1 O/B 57/4.95.
Resizing throughout the tutorial is done with “Resize all Layers” NOT checked.
Open a new image, 600x500, transparent background.
Open Frame2_ThatMagicMoment_JST, copy&paste as new layer, Resize 55%.
Open Paper16_ThatMagicMoment_JST, copy.
On the frame layer, either your Selection Tool – Rectangle or your Magic Wand, clicking into the center of the frame and the ‘empty spaces’ between the roses in the lower part of the frame.
Selections – Modify – Expand by 2.
New Layer – on new layer – paste into.
Selections – Select none.
Open vdaylove4, copy&
paste as new layer, Resize 45%, Move underneath frame layer, position to liking.
Use your Selection Tool to erase the gown sticking out on the bottom of the frame (and/or any other parts that might be extending out of the frame).
Apply Dropshadow.
Highlight frame layer, merge down twice (frame, tube and paper).
Apply Dropshadow.
Open Mailbox_ThatMagicMoment_JST, copy&paste as new layer, Resize 30%; Move on to of frame layer, to the right side.
Use your Selection Tool – Point-to-Point, to erase part of the ‘post’ of the mailbox where it covers the rose.
Apply Dropshadow.
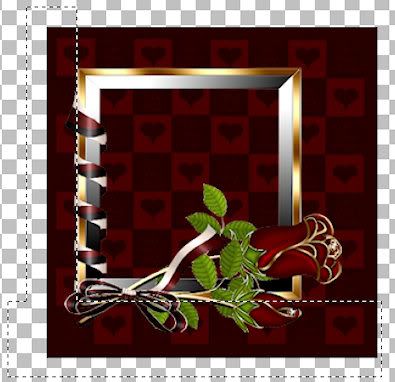
Open Paper6_ThatMagicMoment_JST, copy&paste as first paper layer, Resize 37%, move underneath frame layer as well as a bit up and to the right of the frame.
With your Selection Tool – Rectangle, mark the left side and the bottom part of the paper (see picture below):
Open Paper15_ThatMagicMoment_JST, copy&paste as new layer, Resize 35%; Move underneath frame layer, on top of the second paper layer.
Selection Tool – Circle – start in the center of the paper, and draw a circle. I drew mine about 230x230 – but feel free to use a different size.
Selections – Invert – On the paper layer, hit “delete”.
Selections – Select none.
Move the circle to the left and a bit down.
On circle layer, merge down (with second paper).
Choose a color from your tube (or frame).
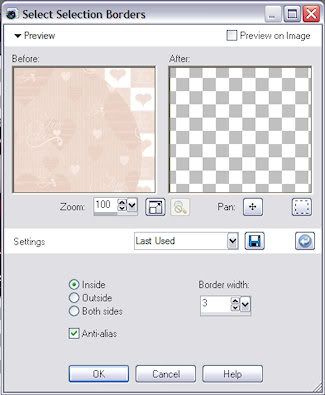
Selections – Select all – Float – Defloat – Modify – Select Selection Borders – Inside and Anti-alias checked, Border width: 3.
New Layer – flood fill your selection with the color you chose.
Selections – Select None.
Apply Dropshadow.
Open HeartRibbon1_ThatMagicMoment_JST, copy&paste as new layer, Resize 61%; move on top of frame layer, on the upper edge of the paper.
Apply Dropshadow.
Open Heart4_ThatMagicMoment_JST, copy&paste as new layer, Resize 40%, move underneath frame layer.
Free Rotate – Left – 33 degrees; Move to the upper left-hand corner.
Apply Dropshadow.
Open Decor2_ThatMagicMoment_JST, copy&paste as new layer, Resize 30%, move to the left, on top of the frame layer.
Apply Dropshadow.
Open Flower3_ThatMagicMoment_JST, copy&paste as new layer, Resize 30%, Arrange – Bring to Top.
Duplicate – on the copy, Resize 85%, Free Rotate – Right 33 degrees.
With your Selection Tool, erase the parts of both flowers that cover the mailbox.
Apply Dropshadow to both flowers.
Open Spiral2_ThatMagicMoment_JST, copy&paste as new layer, Resize 50%, move underneath frame layer and to the bottom.
Free Rotate – Left – 50 degrees.
Apply Dropshadow.
Open Spiral1_ThatMagicMoment_JST, copy&paste as new layer, Resize 50%, move underneath first spiral layer – a bit to the left and slightly lower as the first spiral.
Free Rotate – Left – 50 degrees.
Apply Dropshadow.
Open Bow1_ThatMagicMoment_JST, copy&paste as new layer; Resize 25%; Arrange – Bring to Top.
Free Rotate – Left – 35 degrees.
Apply Dropshadow.
New layer, Arrange – Move to bottom.
Selections – Select all.
Open Paper15_ThatMagicMoment_JST, copy.
On your new layer – paste into selection.
Selections – Select none.
Layers – Load/Save Mask – Load Mask – MaskWSL_238.
Fit to layer, show all masks, source luminance checked; invert transparency NOT checked.
Merge group.
Optional: resize mask or use your Deformation Tool, if necessary, to tweek your mask layers to your liking and/or lower the opacity (I lowered mine to 80%).
New layer – move underneath first mask layer.
Open Paper10_ThatMagicMoment_JST, copy.
On your new layer – paste into selection.
Selections – Select none.
Layers – Load/Save Mask – Load Mask – MaskWSL_223.
Fit to layer, show all masks, source luminance checked; invert transparency NOT checked.
Merge group.
Optional: resize mask or use your Deformation Tool, if necessary, to tweek your mask layers to your liking and/or lower the opacity (I lowered mine to 95%).
Now, the next step is to add any further text, copyright information and your watermark to the graphic.
Feel free to merge all layers visible and then resize to your liking or crop the image.
If you prefer a transparent background, save your tag in PNG format.
Otherwise, if you select the JPG, it will automatically add a white background.
Should you care for a different colored background:
New layer, arrange, send to bottom, and floodfill with your color of choice.
I hope you enjoyed this tutorial!
XOXOXO,
Dani


No comments:
Post a Comment