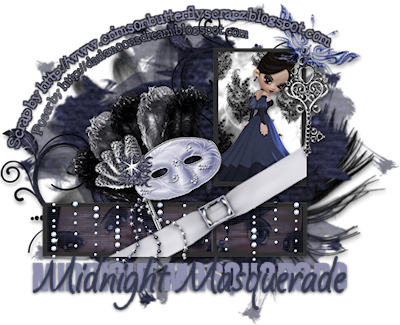
Midnight Masquerade
This tutorial is my own creation and based on my own ideas. Any and all similarities with any other tutorial is purely coincidental.
Please do not upload to or offer this tutorial on any other site without asking me first. Thank you.
Material you will need:
PaintshopPro – I’m using PSP X2, but you should be able to follow the tutorial in any version.
A scrap kit – I used the stunning kit Midnight Masquerade by Crimson Butterfly Scrapz, which you can purchase here.
A font of your choice (or 2 if you wish to recreate a similar effect I used on the tag – one ‘blocky’ font and one script font).
A tube (or several) of your choice or use one, or all of the one’s supplied with the material (all made by me).
A mask –I used WSL 360, created by Weescotslass, which is included in the material. Check out her blog here for further masks.
No filters required.
You can get the material here.
Now, let’s get started. It might be helpful if you choose the elements you wish to use beforehand, and open them up in PSP prior to starting the tutorial. That way, you have them handy when following each step.
Also, you don’t have to slavishly follow each positioning nor setting – play and experiment a bit, especially if you use different elements.
If you are unsure how to position an element, refer back to my sample tag.
I do assume you have at least some to moderate experience and understanding of PSP.
The DropShadow throughout the tutorial remains the same: V/H 3/1 O/B 47/6.35.
Resizing throughout the tutorial is done with “Resize all Layers” NOT checked.
Open a new image, 600x600, transparent background.
Open frame2, copy&paste as new layer, Resize 50%.
Open a tube, copy&paste as new layer. If your using the tube I’m using, Resize 15%,otherwise, resize to your liking.
Place tube underneath frame layer, in the upper right frame.
Open paper13, copy&paste as new layer, Resize 25% (or to your liking).
Place underneath tube layer, in the upper right frame.
With your Magic Wand, click inside the upper right frame.
Selections – Modify – Expand by 2.
Selections – Invert, On tube layer – Delete.
Repeat on paper layer.
Selections – Select None.
Apply a Dropshadow to your tube and then merge down once (tube and paper13).
The next few steps, you will repeat for all three of the bottom frames:
Open a new tube (or use the same one for all three bottom frames), copy&paste as new layer, Move underneath frame layer, in the left bottom frame, Resize and place to liking.
With your Magic Wand, click inside left bottom frame.
Selections – Modify - Expand by 2.
Selections – Invert.
On tube layer – Delete.
Selections – Select None.
Repeat for the other two bottom frames – use different tubes, or the same, and maybe resize it differently, mirror etc.
Once you’ve filled all three bottom frames with a tube, merge these three tube layers (merge down).
With your Magic Wand, click inside all three bottom frames (set the “Mode” to “Add (Shift)” or hold the SHIFT key while selection each frame with your mouse).
Open paper3, copy.
New Layer, Move to Bottom.
On bottom layer, paste into selection.
Selections – Select None.
On your merged tubes layer, set the Blend Mode for the layer to Screen, Opacity 50% (or to your liking).
Copy paper layer, and move above merged tubes layer, change Blend Mode of that layer to Soft Light, Opacity 45% (or to your liking.
Now, close out (click on the ‘eye’ in the layer palette) all layers except for the 2 paper3 and merged tubes layers; Merge Visible.
Open the other layers up again.
Pick a color from your tube or image, Place in Foreground.
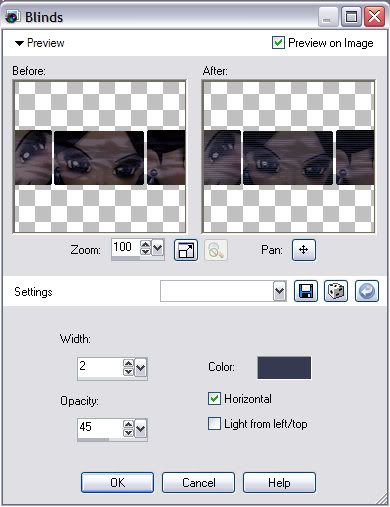
On your merge layer, Effects – 3DEffects – Texture Effects – Blinds.
Width: 2, Opacity 45, Color – the one you just picked (right-click in the Color preview window to open up a color palette, and choose your Foreground), Horizontal checked, Light from left/top unchecked.
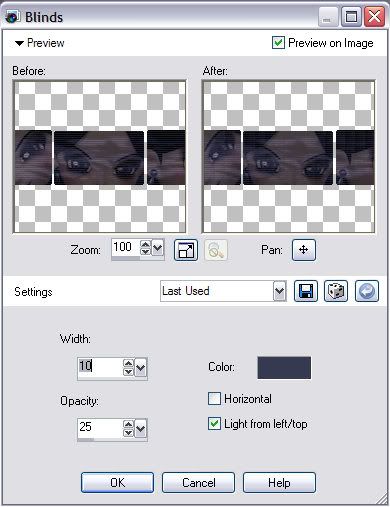
Repeat Effect, but this time, Width: 10, Opacity 25, Color (same color, or different), Horizontal unchecked, Light from left/top checked.
Highlight frame layer, merge down twice (frame, first tube & paper layer, and second tubes & paper layer).
Apply Dropshadow.
Open belt3, copy&paste as new layer, Resize 25%, Free Rotate – Left – 29 Degrees.
Place to the left of the frame.
Apply Dropshadow.
Optional: I erased the right and bottom part where the ribbon is extending over the frame.
Open Mask, copy&paste as new layer, Resize 50%, on top of the belt and move it to the bottom and a bit to the left.
Optional: I erased part of the ‘holder’ to make it look as if it was tucked into the belt.
Apply Dropshadow.
Open rain, copy&paste as new layer, Resize 50%, move underneath belt layer, and place over the three bottom frames.
With your Selection Tool (Rectangle, or Point-to-Point), select the part that is extending above the 3 frames, and erase them.
Apply Dropshadow to the rain.
Open key, copy&paste as new layer, Resize 35%, Place on the top right corner of the upper right frame.
Apply Dropshadow.
Open butterfly2, copy&paste as new layer, Resize 25%, Free Rotate – Right – 33 degrees, Place on top of the key layer.
Apply Dropshadow.
Open flower1, copy&paste as new layer, Resize 75%, Free Rotate – Left – 47 degrees, Move to Bottom and position to the left and up a bit.
Note: I did not apply a Dropshadow, but feel free to do so.
Open feather2, copy&paste as new layer, Resize 50%, Free Rotate – Right – 15 degrees, move on top of flower layer and to the bottom and right.
Apply Dropshadow.
New Layer, Move to Bottom, Selections - Select All.
Open paper11, copy.
On new layer, paste into selection.
Layers – Load/Save Mask – Load Mask – MaskWSL_360.
Fit to layer, show all masks, source luminance checked; invert transparency NOT checked.
Merge group.
Optional: resize mask or use your Deformation Tool, if necessary, to tweek your mask layers to your liking and/or lower the opacity.
Highlight first mask layer, and merge down (with second mask layer) – Optional: I lowered opacity to 85% and used the Deformation Tool to ‘fit’ it to my liking.
Now, the next step is to add any further text, copyright information and your watermark to the graphic.
Feel free to merge all layers visible and then resize to your liking or crop the image.
If you prefer a transparent background, save your tag in PNG format.
Otherwise, if you select the JPG, it will automatically add a white background.
Should you care for a different colored background:
New layer, arrange, send to bottom, and floodfill with your color of choice.
I hope you enjoyed this tutorial!
XOXOXO,
Dani


No comments:
Post a Comment