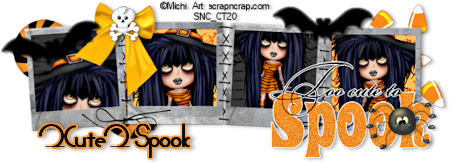
2 Cute 2 Spook
This tutorial is my own creation and based on my own ideas. Any and all similarities with any other tutorial is purely coincidental.
Please do not upload to or offer this tutorial on any other site without asking me first. Thank you.
Material you will need:
PaintShopPro – I’m using PSP X2, but you should be able to follow the tutorial in any version.
A scrap kit – I used the fabulous kit 2 Cute 2 Spook by Mystical Illusionz, find a list of stores she sells in on her blog.
A font of your choice.
A tube of your choice. I used Little Emo Witch by Michi Art, which you can purchase at Scrap N Crap.
No filters required.
Now, let’s get started. It might be helpful if you choose the elements you wish to use beforehand, and open them up in PSP prior to starting the tutorial. That way, you have them handy when following each step.
Also, you don’t have to slavishly follow each positioning nor setting – play and experiment a bit, especially if you use different elements.
If you are unsure how to position an element, refer back to my sample tag.
I do assume you have at least some to moderate experience and understanding of PSP.
The DropShadow throughout the tutorial remains the same: V/H 1/3 O/B 33/6.03.
Resizing throughout the tutorial is done with “Resize all Layers” NOT checked.
Open new image.
600 x 600, 72 dpi.
Open MIZ_quadframe.
Copy & paste.
Resize 65%.
Open MIZ_paper03, copy.
Magic Wand, on frame layer.
Click inside first and third frame from left.
Selections – Modify – Expand by 2.
Bottom layer.
(Or new layer, under frame layer).
Paste into Selection.
Selections – Select none.
Open MIZ_paper13.
Copy & paste.
Resize 15%.
Duplicate.
First copy, second frame.
Second copy, fourth frame.
Magic Wand.
Click inside the second and fourth frame.
Selections – Modify – Expand by 2.
Invert.
On first paper copy layer hit “delete”.
Repeat for second paper copy.
Selections – Select none.
Open your tube.
Copy & paste.
Duplicate 3 times.
Resize & position to liking in each frame section.
On frame layer.
Magic Wand.
Click inside each frame section.
Selections – Modify – Expand by 2.
Invert.
On each tube layer, hit “delete”.
Selections – Select none.
Merge visible.
Open MIZ_candycorn.
Copy & paste.
Resize 25%.
Position under frame layer to the right.
Open MIZ_candy1.
Copy & paste.
Resize 15%.
Duplicate.
First copy, bottom left.
Second copy, upper left.
Open MIZ_spookwordart.
Copy & paste.
On top of frame layer.
Resize 40%.
Position bottom right.
Open MIZ_orangebow.
Resize 25%.
Position between on ‘gap’ between first and second frame from left.
Open MIZ_skull.
Resize 8%.
Top of bow.
Open MIZ_spider2.
Resize 20%.
Bottom right, on top of word art.
Open MIZ_bat2.
Copy & paste.
Resize 25%.
Duplicate.
First copy, upper right.
Second copy, upper left.
On second copy.
Free Rotate – Left – 15 degrees.
Apply Drop shadow as desired.
Then, it is time to add any further text, copyright information and watermark to the graphic.
Feel free to merge all layers visible and then resize to your liking or crop the image.
If you prefer a transparent background, save your tag in PNG format.
Otherwise, if you select the JPG, it will automatically add a white background.
Should you care for a different colored background:
New layer, arrange, send to bottom, and floodfill with your color of choice.
I hope you enjoyed this tutorial!
XOXOXO,
Dani


No comments:
Post a Comment